Sunday, March 31, 2013

Skinner Rainbows

Blends are such a lovely way to meld colors, and the Skinner blend technique is one of my favorites. Actually,  this simple yet effective technique is visible in many of not most polymer artists' works.  One of my favorite blends to create is a rainbow.  These are made using just 3 primary colors:  yellow, red, and blue.  It is the particular shade of each of these colors which determines the rainbow's final colorations.  A rainbow made from fuchia for the red and turquoise as the blue will have a totally different look from one made with, for example, a fire engine red and a cobalt blue.  Additional changes, such as adding white or "mud" to the rainbow will result in further changes such as tone and hue.

I'm going to be the featured artist at the Westerly Arts Gallery for the month of April, and I've been working on pieces for the show.  I'm particularly pleased with three necklaces I made, all using different Skinner blend rainbows.  One piece uses the lei petals I made based on a rainbow blend developed in class with Lindley Haunani.   I strung the beads tightly to get the ruffled effect, then finished the strand with light green new jade, amethyst, and darker green jade beads.

Another necklace is similar to one I've made in the past. This necklace takes forever to assemble, since each flowerette has it's own crystal on a head pin and is then attached to the chain.  I've only made 3 of these, probably because they take so long to make. You can see the difference in the rainbow palette between the lei necklace on the hand display, and the blossom necklace below.


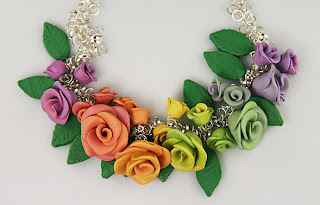
The third necklace used yet another rainbow blend to create roses of different sizes.  I like the movement of these roses and of the blossoms.  The chain adds to the motion with just a bit of sparkle, too.


Friday, March 29, 2013

Concave vs. Convex

Here's something else I'm playing around with right now.  These earrings are longer and larger than my usual pieces.  Somehow, the double layers and the pearl dangles just seemed to need more space. I used Kato clay for these.  I did try Premo! but again it didn't seem to have the "body" and feel I wanted for these earrings.  I really like the way the Skinner blend and the texture contribute additional contrasts to the curved forms. The green earrings curve forward at the bottom while the blue pair curve backward.


This new pair of convex earrings, sports crystals instead of pearls.  Love the summery colors, too.


Wednesday, March 27, 2013

Clay Playing in Circles


It may have been thinking about the CFCF workshop with Lindley Haunani that got me in a "circle" mood....I started with a Skinner blend or two, some circle cutters, and set out to see what would transpire.
Perhaps it's a result of the colors I had chosen for the blend, but my first pieces made me think of the circus, summer fairs, and fun!  The second blend, though more subdued in tone and hue, still made me smile.


Then I decided to try something a bit more three dimensional.  I was still on a circular theme, playing with the way circles could connect and interact.
I had started all the blends using Premo!  polymer.  It worked just fine for the first sets since they were flat and thick enough to be self-supporting.

However, when I started the 3-D pieces with Premo!, it just wasn't stiff enough.  I switched to Kato, and I've been very pleased with the results. These last two photos show my 3-D sets of circular clusters.  I think these will be fun to wear!

Monday, March 11, 2013

Nested Triads

Usually, when you see a curved piece of polymer, the bend is convex.  I decided to try a convex shape. Once I got started, I realized I wanted to group multiple layers together.  Here are my first results.  I really like them.  I used the same drop shape in three different sizes, so that each fit inside the larger one. To connect the three shapes, I drilled holes in each piece that went diagonally through the 3 pieces at the top point.  I also drilled an additional hole in the smallest (top) piece on the lower edge. Using a thin wire, I threaded up through the lower hole, added some beads or pearls, and then passed the wire up through the three holes a the tops of the pieces.  I wound the end in a small circle. This circle helps hold the pinch bail in place.

When I made these, I didn't realize that the way they are connected creates just enough tension to allow the shapes to be "fanned" out.  The aqua piece shows the pendant in both formations.

Now I need to try some other shapes.

Sunday, March 3, 2013

Something New: Scarf Slides!

Spring is quickly approaching - and for me, it can't come soon enough.  Early spring is the time when light scarves come out to add color and a touch of warmth to necklines.  And what would look nicer than a polymer slide to decorate the scarf and help keep it in place?

So here are my first slides.  I plan on making some "plain" ones, but these just seemed to want some extra decoration.

While each of the slides has two sides, the green/teal slide was made with a Skinner blend in mica shift technique, so the two sides have different colors. Two slides in one!

Friday, March 1, 2013

CFCF 2013 - Ellen Marshall

Ah, cabin fever!  Yes, the conference always manages to come at just the right time to get us out of the winter doldrums and charge us up for spring, with new ideas and fresh starts.  Today I share with you some things from my workshop with Ellen Marshall.  Ellen, the author of Polymer Clay Surface Design Recipes, excels at creating unique design sheets.  What you decide to do with them is a personal choice.  I took Ellen's workshop in part because I know she uses a lot of different products to create surface sheets including paints, pastels, oils, dyes and inks.  Since I usually depend on the clay for color and design, and have only used paints for silk screening, I thought it might be nice to explore more options.

And I was right.  Ellen's class was a lot of fun.  Everyone created several sheets for later use, and I really enjoyed seeing the color combinations and designs that were developed.  To the right is a snap shot of a couple of the sheets I made.  I used a thin wire to create squiggle shapes, dipped them in acrylic paint, and used them like stamps to put a layer of designs over the the background. The backgrounds on these sheets were created with dyes or acrylic paints, applied with textured sponges.  Such fun - and results you can't get with clay alone.

When I got back home, I made up a few pairs of earrings from some of the sheets I'd made.  I don't know if you can tell, but the stamped portion of the design is actually raised due to the acrylic paint, and creates a bit of texture.  These have to be given a protective coating to ensure that the paints and dyes last well.  I expect I'll be experimenting with more surface designs along these lines soon.