Wednesday, December 22, 2010

Peeking Inside Hollow Lentils

Oh, yes!!
I love the whole idea of "peeking inside" a bead. If you scroll through my past postings to August 18, you'll see I was playing then with a "peek inside." At that time, I used filled shapes covered with mica shift. The openings in the top of the lentil shapes revealed various inclusions, such as crystals and enamel flowers.
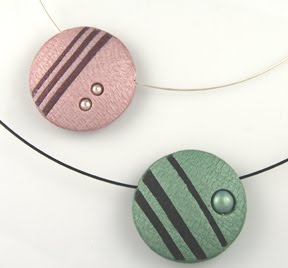
During the past couple of weeks, I decided to give hollow lentil beads a try. These are incredibly light weight, and allow a different method of opening to the inside. Here are some of my new pieces. The two on the left are hung on wire chains. Directly below, peeking inside these three pieces reveals glass pearls, a crystal, and an oval-cut stone.


The bottom photo shows something else new. I decided to see how things would look if the front section was larger and more open. This also gave me the opportunity to use some liquid polymer pieces I made. I love the effect they create in these focals. In case you're curious, the middle piece is a hollow lentil with mica shift veneer.

Monday, December 20, 2010

Tear Away Technique

What a great way to make textures and designs on your polymer pieces! I'd first learned about the Tear Away Technique in a metal clay (PMC) workshop. Celie Fago was given credit for inventing the technique which allows one to create textures from black and white drawings - either your own, or from the numerous copyright free publications available. The process uses polymer clay to create the textures. The texture is transferred paper, and then is used to texture the PMC. The finished silver pieces are lovely and unique.
However- drum roll! - the applications of this technique don't stop there! I'm sure other folks have discovered this, too, but it was a revelation to me. I looked at the polymer piece left after the paper texture was removed and realized that the design in the polymer could be enhanced with paints or other colorizations, and the polymer could then be used in other ways, such as in jewelry.
So, I went on a binge making tear away papers for PMC and then using the polymer pieces for pendants. Had to share the results! Yes - one of the pieces does not use the tear away texture. It's just based on an extruded cane.

Wednesday, December 8, 2010

More 3-D

I'm really enjoying the feeling of manipulating the clay into little floral shapes. Here, I started with a Skinner blend-shaded bull's eye cane to create these calla lilies. Love the intensity of the color!

And I'm still on a bit of a rose-roll... I decided to try a different sort of pin, so purchased some stick pin backs, and set to work. After making a couple of wild roses in matte colors, I decided to see what would happen if I tossed in some embossing powders. I think the result is quite festive - what do you think?

Saturday, December 4, 2010

Roses for the Holidays

Roses are one of my favorite things to make. Perhaps it's because they're my "birth-flower" or the fact that roses come in a myriad of colors, or maybe it's just that they're fun to make. :) Whatever the reason, I enjoy making them and putting them in different configurations. The other evening, I was playing with a bit of clay, making it into a square....which became a rectangle...which became a pointed rectangle....with a twist. Suddenly, it seemed I had just made the perfect vase to hold a single rose. I custom mixed some mauve tones, and here are the results.
These first ones have a matching tube in the back to hold a chain. I'm also experimenting with pin backs. Here's a photo of a green/red/white rosevase from the back. Notice the pin back is hidden by a leaf.


This last photo shows a pendant hanging from black wrapped wire.

Friday, November 26, 2010

Of Brooches and Bangles

I'm sure many of us are in the same boat. The holidays are approaching, and you're either ramping up for shows, ramping up for gifting, or just ramping up. ;) Recently, I've had requests for bangle bracelets, so have been making a few. Some I've made smooth, which means the size is set. I've made others where I sized them. The need to be able to size a bracelet, and then make sure the place where the ends join looks nice, is one of the issues polymer folks face. You can, of course, cut the bracelet, and then wrap the spot where they join with more polymer. Another solution is to use commercial tubing cut to an appropriate length. PMCers can make their own fine silver tubes, and really make a statement. I decided to try something from the seed beading world. I created bands of seed beads which are woven around the polymer bangle, hiding the join area and adding some sparkle and - I think - a bit of class. The example above shows 3 bracelets with seed bead closures, one with none.
I've also been making some bracelets using brass channel bangles and inserting polymer canes. I've had some requests for classes for bangles, so will be teaching classes in both techniques. Details and more photos are on the class and workshop page.
The other thing I've been playing with is brooches. I've never made pins before, and found myself wondering if a particular piece should be a pin or a pendant...So I purchased some of the pin/pendant convertible closures, and each of my pieces can be either a pin - or a pendant! I agree with Arlene Harrison who had seen these at a Klew workshop - they are a nice, nice solution. I particularly liked this one:

Saturday, October 23, 2010

Fall - Flowing & Floating

I've been having so much fun! This all started out as a fall flower cane - at least that's what I had intended...I loved the colors I was mixing, and began playing around with them. This "flowing" background developed as a result. The background seemed to be begging for little floating flowers, so I had to oblige. The round and oval pieces are pendants.

I plan to turn some of the rectangles into pins, or pin/pendant combinations. Not completely decided on that one. What do you think?

Saturday, October 2, 2010

Fall Leaves...

I love leaves. I love their shapes, their textures, and their colors - especially the colors they wear in fall. Recently, I ran across some leaf pins made several years ago by Mike Buesseler, and decided to create my own version.

These pieces are such fun to make! I used Skinner blends to form the base. Real leaves were impressed into the background using a roller. I used various types of texture devices to secure the edges of the leaf. The texture was also used to add interest to the rest of the background. I used Pearl Ex Powdered Pigments to add color and shine to the background. The leaf was then removed, and the resulting tile was placed on a complimentary background. The photo shows some pendants I've made with matching bails.

I also made some changeable pin/pendants. The finding on the back has both a bail for a chain and a pin backing so the wearer can decide which style works best. Don't you just love versatility?!

Friday, September 17, 2010

Oooo - That Liquid Polymer!

You may have figured out by now that I like to experiment. I've really been enjoying the liquid polymer and then had a thought - what would happen if I mixed in some powders? How would it change the look? Sooo...I mixed in some glittery embossing powders from Judikins and I love the results! Here are examples of my first efforts.

Oh - you'll also notice I had to try gold, too, so got my hands on some gold-filled bezel wire for the edgings. The gold is quite elegant. Here's a close-up. Hope you can see the glitz and some of the depth these pieces have.

Of course, since I like to experiment, and I love the mica shift technique, I decided to combine the two. Here's my first piece.
Since the liquid polymer piece is different on both sides, I had to make the main piece reversible, too. What do you think?

Friday, September 10, 2010

Torn Paper Watercolor Technique

Here is a great technique - easy to do, and so variable! I love making the sheets, tearing them up, and combining the pieces to create color-collages. When the torn sections are rolled smooth, the look is really wonderful. You can use the sheets and torn bits to decorate almost anything - jewelry, as I have here - or objects such as boxes, or bowls, or tool handles, or whatever you wish. Here are some of my latest pieces. The pink pendant below is reversible to a blue torn paper collage on the other side.
These earrings show two different color
paths for fall foliage collages.
This pendant has larger pieces of the sheets on one side, torn bits on the other. Not only is the whole piece reversible, but each section can be rotated separately so that colors from both sides show.

Wednesday, September 1, 2010

Exploring Liquid Polymer

This is such fun! I like trying new processes, and I've just started exploring liquid polymer. I decided to try an idea that comes from Bettina Welker of Germany. I wanted different colors, so experimented with mixing my own colors using alcohol inks - also a first time venture for me. I think the colors came out beautifully.

These pendants are incredibly light weight - you don't even know they're around your neck. I love the way the translucent base makes the colors almost glow. Here's a close up - hope you can see what I mean. I textured the fine silver edging strips for contrast. The strips add some structure and support to the liquid polymer, as well as some interest.

Another feature is the process makes each strip 2-sided so you have the option of using a more detailed, matte side or a more blended and shinier side. On top of that, even the finished pendants have 2 sides, making them reversible!

Here are two photos of the same pendants - side A and side B.

Wednesday, August 18, 2010

More Mica Shift: A Peek Inside

As you may have guessed, I really love the effects one can achieve with the mica technique. I decided to try something with a little more contrast and a different focus. It's a bit like taking a "peek inside".

In some cases, the "found" object led the way to custom color and design. In other cases, the clay determined the piece inside. Here are a few more:

Monday, August 16, 2010

What a Difference Materials Make!

My husband and I are just back from a 12 day trip to Michigan. We spent a week of that time bicycling 45 - 65 miles per day along the east side of Lake Michigan from Montague all the way to Mackinaw City. Lovely country, some beautiful views, and hills!! .... all of which my legs are still feeling...

However, cycling wasn't the hardest part. The most difficult was being away from our three Aussies, "the girls." They are a huge part of our lives, and we miss them when we travel. The other piece that was hard for me was being away from my clays and beads. I had lots of ideas which I sketched at evening time, but I really missed the actual hands-on "doing."

So, when we got home, I finished up a sample bracelet for one of the beadweaving workshops I'm doing. I wanted folks to see how very different the same piece looks made out of different materials. These examples, I think, show it quite clearly. This particular stitch looks very elegant and classy when made up in Swarovski crystals. On the other hand, it has a more subtle effect when made out of natural stones. Here are side-by-side photos - what do you think?

Monday, August 2, 2010

Two New Events for Fall!!

Hi!
Just wanted to let you all know that I've added 2 new events to the fall calendar. One is a "sort-of" class - but something several folks have been requesting. The other is definitely an event - and one I hope many of you will decide to attend. Both take place at Meiklem Kilnworks on the Franklin/Bozrah line.

The special event will be in held on September 17th from 6:00 - 9:00 (or any portion thereof). This session is free of charge, and is designed to give people an opportunity to make Bottles of Hope. Come cover tiny bottles with polymer clay, decorate them any way you want, and donate them to the Bottle of Hope program. Bottles of Hope are small glass bottles covered with polymer clay and given to cancer patients. They symbolize a wish and a hope for health This project was started in 1999 by a Rhode Island cancer survivor and has spread internationally. For more information about Bottles of Hope, visit http://www.scpcg.org/bottlesofhopepage.htm. Visit www.meiklemkilnworks.com for info about the evening.

The other session is something several of you have requested - a time to finish the uncompleted projects, start a second project based on one done in class, or fix a problem that has you stuck - and unable to continue with your piece. Cost is only $10 for the evening which will be eld on Wednesday, October 20 from 6 to 9. Creative endeavors, good company, and the opportunity to finish a project - YES!

Saturday, July 24, 2010

Playing with Mica Shift

Mica Shift - what an incredible technique! I started playing with it one day, and just can't seem to stop. I especially like the way Skinner blends look with the mica sift technique applied. Of course, once you have these lovely sheets, you need to do something with them...Then I found some little curved spacers at Beaded Impressions, and decided to see how they'd look as embellishments. Here's a couple of pendant/earring sets ~ I especially like the fact that the little discs move and twirl.

Just so you can see the discs and the mica pattern, here's a close up:


I also had to incorporate PMC in a piece with a little movement. I really like the ability to have the texture that is imbedded in the PMC echoed in the smooth mica shift of the polymer. What a great combination of media!

If you're not familiar with the mica shift technique, there is a great tutorial on Polymer Clay Central. The tutorial is done by Kellie Robinson, and is very clear with excellent photos. Here's the URL:
http://www.polymerclaycentral.com/ms_texture.html
Give it a try! Bet you can't do just one!

Monday, July 19, 2010

Photos and cabinets and clay folk - Oh, my!

Hello! Just some "bits" I wanted to share:

First, the clay folk ~ On Saturday, I attended the monthly meeting of the Southern Connecticut Polymer Clay Guild. They're a great group - fun, creative, interested in each other, and interesting in and of themselves. They are planning a special polymer clay conference called the Clay Connection in early August. If you're at all interested in Polymer Clay, be sure to check out the Conference information at: http://www.scpcg.org/clayconnection.htm. It promises to be a great event - and it's being held at Conn College, so it's really close for those of us in Eastern CT.

Second, cabinets ~ You know you're in trouble when assembling a storage unit makes you excited. Undoubtedly like many of you, the dining room table has been serving as my "workspace." (You can substitute another room in the house, but you know what I mean.) As he walked by the other day, my husband asked if I could recall what the table was made of - wood, perhaps, or glass?.... Well, soon I'll be shifting location and the dining room will be for people and eating once again.

The move is possible because I finally decided to purchase a mini stackable unit from BEST Craft Organizer. Don't let the "mini" fool you. This unit is 39" x 41" and has twelve 3.5"drawers, twenty-one 2" drawers, and twelve 1" drawers. I can't wait to start shifting all my supplies, projects, and materials into the unit. Organization heaven. Why did I wait this long??

Finally, photos ~ I have a little unit for photo taking, but haven't really set it up. Today, in the flurry of excitement about everything else, I decided to give it a try. My favorite shot is of the bracelet attendees will be making at the first beadweavingworkshop at Nature's Art, September 11th. Here's a sneak peek:

Take care, all

~Kristie

Thursday, July 15, 2010

Dragonflies


One of the things I love about summer is the dragonflies. They come in such a myriad of colors and sizes, and flit from place to place with those wonderful iridescent wings. When they first appeared around here in June, I was watching one as it settled on a rock. And it hit me - I had to try making a dragonfly on a rock! So off I went to figure out how to make all the components - including a rock. Hadn't done that one before.....

Now, several pebbles and wing canes later, I've made a little dragonfly "collection." So far, most are with polymer, but I do have one with a PMC dragonfly, so I'll have to share that too. If anyone has other interpretations of dragonflies, especially resting on pebbles, I'd love to see them!

Sunday, July 11, 2010

ACGOW ~ Artist's Cooperative Guild of Westerly

I've just come from the Artists' Cooperative in Westerly, Rhode Island. I was juried into membership in February, and have been enjoying learning about and experiencing a true cooperative. The members are such a varied and eclectic group - and all really committed to their art and making the cooperative work and grow. The members do everything - and I mean everything! We maintain and manage the gallery, run the business and social end of things, and work together to further awareness of and appreciation for the arts. We just had our largest annual fund raiser - a silent auction. It was my first experience with one, and I was pleased that 2 of my pieces were sold. They both represent new approaches for me. Thought you might like to see photos.

Friday, July 9, 2010

A blog.

The first question I asked myself was "why a blog?" Tons of answers rushed back. When I really looked at them, they all boiled down to one thing: Connection. I create things with my hands and I have a desire to connect with others who also create. The Internet has opened the world to us - and I'd like to be part of that. So welcome to my blog. I look forward to sharing ideas, experiments, experiences, and questions, and to meeting others in the online community.